Monday, February 28, 2011

Big Italian Dinner!

I feel like spaghetti and meatballs is always a dish that you compare to your parents (or grandparents!) so I was nervous to make this for the Lawyer but he loved it! And it wasn't a boyfriend lie! I first had this meatball recipe when Grandma Nancy made it for me and even better, it's a Wegman's recipe (♥!)! Grandma made the meatballs according the recipe, the first time I made them I used asiago cheese and they were still amazing. This time I followed the recipe and used pecorino romano. I would change nothing about this recipe unless you wanted to experiment with the cheese, which I completely approve of. The panko breadcrumbs are essential (and we all know what a sucker I am for panko!) These are my go to meatballs!


Wegman’s Meatballs!


(Wegmans obviously)
Ingredients: 
1 cup Panko Breadcrumbs
2 large eggs
1/2 cup water
1/3 cup grated Pecorino Romano Cheese
2 tsp minced Garlic
2 Tbsp minced fresh Italian parsley
1 tsp McCormick Italian Seasoning (or a dash of oregano/basil)
1 tsp salt
1/2 tsp black pepper
1 lb Wegmans 80% Lean Ground Beef
Directions: 
Preheat oven to 450 degrees.
1. Add panko, eggs, water, cheese, garlic, parsley, seasoning, salt, and pepper to large bowl; stir to combine. Add beef; mix by hand until just combined (use the claw! overmixing will toughen meatballs). 

2. Scoop up about 3 Tbsp meat mixture to form balls; smooth by rolling in cupped hands. Arrange meatballs on baking sheet, about 1 1/2-inches apart. 

3. Bake 15-17 min or until internal temp reaches 160 degrees.


I also tried a new sauce recipe out. It was pretty good although the name was misleading. I could taste the spicy but not the basil (except for the torn basil we put on top, from my very own basil plant!) I also simmer the meatballs in the sauce for a while after they come out of the oven. Supposedly the pine nuts add a creaminess to the sauce but I'm sure it would be fine without them because 1/4 cup pines nuts is equal to one month of my rent, just kidding! (except not really, those nuts are expensive!) While I'm not as in love with recipe as I am my Wegman meatballs I would make it again, but I would also experiment with new recipes. I did omit the fennel seeds because of my intense (and unfounded?!) hatred of fennel seeds. I like fennel bulb but for some reason I just cringe when I find fennel seeds in my pizza or spaghetti sauce.
Spicy Tomato-Basil Sauce 
(Bon Appétit) 
Ingredients:
4 1/2 cups canned crushed tomatoes with added puree (from two 28-ounce cans), divided
1/4 cup pine nuts
4 1/2 tablespoons extra-virgin olive oil
3/4 cup finely chopped onion
4 large garlic cloves, minced
1 teaspoon fennel seeds (finely crushed in plastic bag)  or not.
3/8 teaspoon (or more) dried crushed red pepper
1/2 cup finely chopped fresh basil
1/3 cup dry white wine
1 teaspoon dried oregano
Freshly ground black pepper
Directions:
1. Place 1 cup crushed tomatoes in blender. Add pine nuts and blend until very smooth, about 1 minute. 2. Heat oil in heavy large pot over medium-low heat. Add onion, garlic, fennel seeds, and 3/8 teaspoon dried crushed red pepper. Sauté until onion is soft, about 5 minutes. 
3. Add remaining crushed tomatoes, 2 tablespoons chopped basil, wine, and oregano. 
4. Scrape in tomato mixture from blender and stir to combine. 
5. Simmer sauce until flavors blend, 5 to 6 minutes. 
6. Season to taste with salt, pepper, and more dried crushed red pepper (I did add more red pepper)
7. Add your meatballs!

Yet another compound butter!

You might recall the sweet and yummy Cinnamon Honey Butter that I often pair with my english muffin loaf and if you don't, I suggest you make it soon! Tonight we made a more savory compound butter for our huge Italian meal. It's great on plan bread, pasta or on little toasted crostinis (I even added a little extra pecorino romano on top!)
Garlic Butter
Ingredients:
1 cup butter, softened
1 tablespoon minced garlic
1/4 cup grated Parmesan cheese
1 tablespoon garlic powder
1 teaspoon Italian seasoning
1/2 teaspoon ground black pepper
1/4 teaspoon ground paprika
Super Easy Directions:
1. Mix everything together.

Saturday, February 26, 2011

Girl Scout Cookies Part 2!

Last weekend I conquered Caramel deLites and Peanut Butter Patties. This Saturday I got in a fight with a college staple, Thin Mints. (This is for you G-Babe!) Once I again I divided up the batch into two different recipes. The first I followed was for the classic thin mints. I learned from the Peanut Butter Patties and went with dark chocolate instead of semi-sweet and tried to use less chocolate in the coating process. However covering things in chocolate is both messy and a pain (admittedly I was feeling a little lazy today) so eventually I started putting the chocolate on with a spatula much like you would frost a cupcake. The second batch is my pimping Thin Mints on steroids and now I will never go back to normal Thin Mints (That is a challenge!). These cookies have a layer of peppermint buttercream layer that is just heavenly.
Homemade Thin Mints
 
(with and without Peppermint Buttercream)
Ingredients:
2 1/4 cups all purpose flour

1/4 cup cornstarch

6 tbsp unsweetened cocoa powder

1/2 tsp salt

1 cup white sugar

1/2 cup butter, room temperature

1/3 cup milk
1/2 tsp vanilla extract

3/4 tsp peppermint extract or more if you want it super minty (Note: extract is different than oil!)
Directions:
1. Whisk together flour, cornstarch, cocoa powder and salt.

2. In a large bowl, cream together butter and sugar. Add in the milk and the extracts. 
3. Gradually, add in the flour mixture until fully incorporated.

4. Shape dough into two logs, about 1 1/2 inches (or about 4 cm) in diameter, wrap in plastic wrap and freeze for at least 1-2 hours, until dough is very firm.

5. Preheat oven to 375F.
Slice dough into rounds not more than 1/4 inch thick and place on a parchment lined baking sheet. 
Bake for 13-15 minutes, until cookies are firm at the edges. Cool cookies completely on a wire rack before dipping in chocolate.
Peppermint Buttercream Layer
 
Ingredients:
2 cup powdered sugar

4 tablespoons melted butter

2-3 drops pure peppermint oil
 (Note: oil is different than extract!)
1/2 tsp. heavy whipping cream
 
Directions:
1. Mix together until it becomes thick and easy to roll with a rolling pin. Roll until about 1/4″ thick. Cut into desired shape. Place atop cooled cookies.
Dark Chocolate Coating

Ingredients:
10-oz dark or semisweet chocolate

1/2 cup butter, room temperature
1-2 drops peppermint oil
Directions:
1. In a microwave safe bowl, combine chocolate and butter. Melt on high power in the microwave, stirring every 45-60 seconds, until chocolate is smooth. 
2. 
Dip each cookie in melted chocolate, turn with a fork to coat, then transfer to a piece of parchment paper or wax paper to set up for at least 30 minutes, or until chocolate is cool and firm.

Unattractive, Lazy Chocolate Covered Cookies.

Notes: Watch your cookies! I baked mine for the recommended amount of time and they are a wee bit crunchy. Not burnt or too hard but I like mine a bit softer. About Extracts/Oils: Pure Peppermint Oil is much stronger than Peppermint Extract. If you use oil you need significantly less than extract.

Meatless Saturday!

All of my food magazines (of which there are entirely too many) tell me that I should strive for at least one meatless day in order to reduce my carbon footprint and be a sustainable individual. During the week breakfast and lunch are normally not a problem for me. But living with a boy makes a meatless dinner pretty hard. Today we succeed!
Feder's (our neighborhood farmer's market/specialty store) has an amazing mushroom salad but I wasn't about to pay five bucks for a small container. So I hunted down a recipe online, served it with some homemade pita chips and it came out pretty darn good! The Lawyer says it's a keeper.
This time I did the pita chips with some olive oil I sautéed up with some garlic. The garlic complimented the mushroom salad very well. They were whole wheat pitas from Feder's (even more healthy!). The original recipe is here!
Creamy Mushroom Salad with Pita Chips
Ingredients:
4 cups fresh mushrooms, sliced
8 oz. cream cheese
1/3 cup mayonnaise
1/2 teaspoon salt
1/4 teaspoon pepper
2 tablespoons grated onion
Directions:
1. Mix together all ingredients except the mushrooms.
2. Gently fold in the mushrooms.
3. Serve on pita chips! Or some nice crisp leafy lettuce.
As I mentioned, nice and yummy. I'm thinking that it's going to be like a macaroni or potato salad and that by tomorrow all the flavors will melt together and it will be even more yummy!
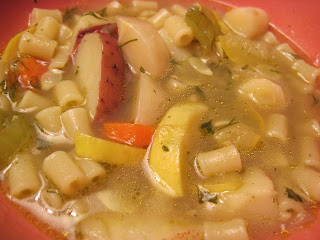
Mr. Lawyer's Winging it Veggie Soup!
Mr. Lawyer bought a pre-packaged bunch of soup veggies from Feder's which contained parsnips (yum!), carrots, yellow squash, celery, a shallot, red potatoes, and some dill. He made a broth from the veggie bouillon we have, through everything in with some cracked pepper and the leftover garlic chunks and olive oil from my pita chips and let it simmer till everything was perfectly creamy and cooked through. He then added some pasta and left it cook an additional 10 minutes. He had no plan and winged it and it turned out great! The bouillon added some saltiness, the squash and potatoes some creaminess, parsnips are just yummy, and the pasta soaked up any extra broth so it wasn't too watery.
mmmmm mushrooms!

Entertaining with Cookies!

We've been super social lately so I have been entreating our guests with cookie platters! After going out for a bit to eat and a couple of brews, including the elusive B*Brew by Dog Fish Head, the boys came back to our place for a sweet treat of homemade Caramel deLites, Peppermint Patties, and Brown Sugar Glazed Bacon. Cutting up the huge cookies not only looks pretty but it makes a nice finger food/one bite sized piece that you don't feel too guilty about eating.
Dog Fish Head!
Yummy bite sized goodies!
A few days later we had the high school gang over for pre-birthday celebration and behold another cookie platter!

Monday, February 21, 2011

Brown Sugar Glazed Bacon

I was trying to be healthy and have a salad for dinner but I always get carried away with toppings which negates the potential healthiness of my poor salad. I started with some romaine, a little bit of onion, a couple of carrots, dried cranberries and some sunflower seeds. Then came the hard boiled egg, Cabot Cheddar and the Brown Sugar Glazed Bacon (often known as candied bacon). All of this was topped off with some Hendrickson's Sweet Vinegar and Olive Oil dressing. But everything is better with bacon right? Like scallops. They're fine by themselves but so much better when they are wrapped in bacon.
I first had this wonderful bacon when Melissa made it at the Lawyer's graduation brunch. It's amazing and completely addicting. It's great by itself or on a salad or with waffles or with anything really. Best of all it's incredibly simple (or worst of all?....)
Brown Sugar Glazed Bacon
(Bon Appétit Magazine)
Ingredients:
1 pound applewood-smoked bacon slices or thick-cut bacon slices
1/3 cup (packed) golden brown sugar
Directions:
Position 1 rack in top third of oven and preheat to 400°F. Line large rimmed baking sheet with foil. Place large rack on lined baking sheet. Arrange bacon slices in single layer on rack. Sprinkle brown sugar evenly over. Bake until bacon is crisp and glazed, 15 to 18 minutes. Cool 5 minutes and serve.

Behold the mega-salad!

Sunday, February 20, 2011

Girl Scout Cookies!

Every year G-Babe's dad would load us up with Girl Scout Cookies in college. Then it was Nyk's dad in grad school. Now I'm a broke big kid but I was a Girl Scout and they taught me to be resourceful and thrifty so now I make my own Girl Scout Cookies! Behold the glorious mess of Jenni the Kitchen Hurricane and her homemade Girl Scout Cookies!
I decided to go with two of my top three cookies (Caramel deLites, Thin Mints, and Peanut Butter Patties. Side note: Samoas and Tagalongs for all you lame people). The deLites and Patties use the same cookie dough so it seemed like the easiest way to have variety in my cookie stash. I was worried about the caramel as I have never made it before but it came out well and was easy to clean up (much to my surprise). However, the darn chocolate was a disastrous mess! It got all over including but not limited to: my wine glass, inside the fridge, all cabinet knobs, my camera and the bottom of my computer mouse. Surprising enough there was very little of it on my apron. Shocker I know since I am a messy messy hurricane in the kitchen.
The result: Some very yummy cookies that are only moderately pretty (as in the Jenni M.O.) The Caramel deLites were great (and larger then those puny things they sell nowadays!). I think the Peanut Butter cookies need a little tweaking but Mr. Lawyer said they were all fine and wonderful. I would double the peanut butter filling and add a bit more in addition to switching the chocolate topping. I used the semi-sweet chips it called for but it is very sweet and overpowering. There's just so much of it! Maybe next time I'll use milk chocolate or a mix or just drizzle the chocolate over it instead of dunking it.
Also: Parchment Paper is your best friend.
Homemade Caramel deLites and Peanut Butter Patties
(Recipe from the Mother Unit)
Cookie Dough Ingredients:
2 sticks (1 cup) unsalted butter at room temperature

1 cup superfine sugar (or granulated)

1 large egg

1/2 teaspoon pure vanilla extract

1 teaspoon kosher salt

3 cups unbleached, all-purpose flour

Directions:
1. Cream together butter and sugar. Beat until light and fluffy. Add in egg and beat well. Add in vanilla. Beat until smooth. With mixer on low, add in salt and flour. Mix until completely incorporated and dough is uniform. Pull dough together and shape into a cylinder with a diameter of about 2 1/2 inches. Wrap in parchment paper and freeze for at least 25 minutes.
2. Preheat oven to 350 degrees. Slice dough into 1/8 inch disks and place on baking sheets, about an inch apart. For deLites use a tiny circle shaped cookie cutter or a large round cake decorating tip to cut a hole in the center of each disk.  (I used my cupcake corer to make the holes for the deLites and it was glorious!) for patties just leave the circle along. Refrigerate for an additional 10 minutes. Bake for 8 minutes, or until crisp. Let cool completely.
Cooling Cookies!
Caramel deLite toppings:
Dipping Caramel

1 cup unsweetened shredded coconut
12 ounces of chocolate chips 
Dipping Caramel:
1 1/2 cups granulated sugar
4 tablespoons corn syrup

6 tablespoons water
pinch of salt

6 tablespoons butter

6 tablespoons heavy cream
1 1/2 teaspoons pure vanilla extract
Caramel Directions:
1. In a heavy bottomed saucepan with high sides, combine sugar, corn syrup, water, and salt. Whisk until combined, and set over medium-low heat. Swirl the pan every now and then to help distribute the heat. Use can use a pastry brush dipped in water to brush the sugar crystals down the sides of the saucepan. When the sugar dissolves completely, raise the heat to medium. When it comes to a boil, watch very carefully for the bubbles to become more viscous (this means that the water has evaporated and that it is ready to go through the candy stages). As it is bubbling away, you want it to turn a deep amber color. When it does, remove the heat and, working quickly, use the spoon to scoop up a small amount of the candy and drop it into the small glass of water. If the blob turns hard like lollipop, then it is ready. If the blob is still soft, put the pan back on the heat. Keep testing until the candy is hard. Remove from heat.
2. Whisk in butter, 6 tablespoons of cream, and vanilla (Careful here, as the mixture should bubble violently for about 10 seconds). If the caramel isn’t smooth right away, return the pan to low heat and whisk until smooth.
Making the Caramel and Melted Chocolate
Caramel deLite Directions:
1. Add coconut into the caramel. Warm the caramel in the microwave for about 10 seconds if necessary. Take cooled cookies and gently dip them completely in the caramel. Place on a parchment paper lined baking sheet. Freeze until set, about 5 minutes.
2. Melt chocolate in a microwave safe bowl in 30 second intervals, stirring well after each interval, until fully melted (or in a ghetto double boiler like a real cookie chef!). Place the caramel coated cookies in the chocolate. Use a fork to pull them out of the chocolate and place them on a parchment line cookie sheet. Use the chocolate still on the fork to drizzle stripes over the top of the cookies. Refrigerate until set. 
Gooey Caramel!

Peanut Butter Patty Toppings:
1/2 cup smooth peanut butter

1/2 cup confectioner’s sugar

2 cups semi-sweet chocolate chips
Peanut Butter Patty Directions:
1. Mix together peanut butter and powdered sugar. Form into small disks and press onto cookies. Melt chocolate in a microwave safe bowl for 30 second intervals, and mix well after each interval. Coat cookies completely in chocolate and lift out with a fork. Place on a parchment lined baking sheet and let set, or freeze to speed up the process.
Peanut Butter!
The Final Product!

Wednesday, February 16, 2011

Buttered Toast Crispy Fishwiches

This post is for my dear Guenevere who requested a fish recipe! The Valentine's salmon that the lawyer made was quick and yummy but salmon is not for everyone so this recipe uses a more mild fish. Recipe Rant: Oh Rachael Ray how I despise you and your tv personality. Not to mention your abbreviations and measurement system. But oh how I love your recipes!
Buttered Toast Crispy Fishwiches
(Rachael Ray Magazine)
Ingredients:
4 tablespoons melted butter, plus some for toast
1 1/2 cups Panko crumbs
1 tablespoon Old Bay seasoning, a palmful
1 tablespoon onion powder, a palmful
1 tablespoon garlic powder, a palmful
Zest of 1 lemon
A couple of tablespoons thyme, freshly chopped
A couple of tablespoons chives, finely chopped
4 pieces cod filet, 6-ounces each (or other firm white fish, such as tilapia)
Salt and pepper
2 egg whites, beaten
4 sandwich-size English muffins, toasted and buttered or some other yummy crusty bread
Garnishes:
Lemon juice or malt vinegar, oil and vinegar-dressed slaw salador shredded iceberg lettuce, bread-and-butter pickle slices, finely chopped red onion
Directions:
1. Preheat oven to 425˚F.
2. Pour melted butter over Panko crumbs and work into the crumbs to evenly distribute. Season the crumbs with Old Bay, onion and garlic powders, lemon zest, thyme and chives.
3. Season the fish with salt and pepper, and coat in egg whites, then crumbs and arrange on slotted broiler pan or cooling rack arranged over baking sheet. Bake 20 minutes or until deeply golden and crispy, and dress with lemon juice or malt vinegar.
4. Serve on toasted muffin or muffin bread with slaw or shredded lettuce. Top with pickles and onions, and muffin top or toasted muffin bread.

I've made this recipe three times and it's great. It's easy, quick, and baked not fried! I've always used tilapia. One time I omitted the fresh thyme and chives and another I subbed a splash of lemon juice for the zest. Every time it was yummy! The first time I made it into a sandwich but it's so delicious and filling you don't really need the bread (plus it's less carbs!). The Old Bay and Panko crumbs are pretty clutch so I wouldn't recommend changing them. Fresh herbs are way better than dry but if you do decide to use dry herbs make sure to reduce the amount! (a 1:3 ratio, if it's 1 tablespoon fresh, use 1 teaspoon dried) Oh! And I added some shredded parmesan to mine because I'm a cheese fiend.
Look at those fresh herbs from my garden!

Tuesday, February 15, 2011

Happy Valentine's Day!

I started my morning by making surprise Almond Valentine Cookies. This recipe is also known as Candy Cane Cookies but I just shaped mine into hearts instead of candy canes. I was also trying out an almond emulsion instead of extract. Emulsions are often used by professional bakers for a more in your face flavor. They are alcohol free so the flavor doesn't bake off when it's heated. The cookies did come out pretty almond-y!
Almond Valentine Cookies
(Joy of Baking)
Ingredients:
2 1/2 cups flour
1/4 teaspoon salt
1 cup unsaltedbutter, room temperature
1 cup confectioners sugar
2 large egg yolks
1 teaspoon pure vanilla extract
1/2 teaspoon pure almond extract (or almond emulsion!)
1/2 teaspoon red food coloring
Directions:
1. In a bowl, whisk the flour with the salt.
2. In a second bowl beat the butter and sugar until creamy. Add the egg yolks and vanilla and almond extracts. Add the flour mixture and beat until you have a smooth dough.
3. Remove half of the dough from the mixing bowl. To the remaining half add the red food coloring and beat on low speed until well blended.
4. Take a walnut sized piece of red dough and a walnut sized piece of white dough. Separately, roll each color on a lightly floured surface, into a 4-5 inch long rope. Place the two ropes side by side, gently press together, and twist the two ropes to form a spiral. Place the cookies on a parchment lined baking sheet, spacing the cookies about 2 inches apart. Shape each cookie into a cane shape or a heart!
5. Preheat oven to 375 degrees and bake 8-10 minutes.

Almond cookies are a nice alternative to your overly sweet cookie. However, this dough is a pain in the butt to work with and you must have patience when twisting the shapes as it is prone to cracking. The cookies are also very fragile when baked so stick to smaller shapes, not giant hearts that break when you carry them all the way down to city hall.

I also made some chocolate covered strawberries! I had some leftover bittersweet chocolate from my birthday Irish Car Bomb Cupcakes so I heated it up, dipped in my strawberries and boom! I butchered up some milk chocolate with white chocolate Lindt truffles in order to get some white chocolate to decorate them with. Do you know how hard it is to scoop out the insides of a Lindt truffle? Outrageous. I combined these luscious berries with some Bacon Wrapped Scallops to created a platter 'o love and romance.
Chocolate Covered Strawberries
(just winging it)
Ingredients:
Strawberries
Dark Chocolate
White Chocolate
Directions:
1. Heat chocolate (I used my ghetto double boiler system consisting of a small frying pan over a pot), once melted dip your strawberries in, place them on a baking sheet lined with parchment or wax paper.
2. Let them cool a bit while you heat up your white chocolate. Drizzle your white chocolate over your strawberries.
3. Place in the fridge until time to serve.
And because Mr. Lawyer deserves some bonus points he shall be a special kitchen guest! He surprised me with a very yummy dinner of baked salmon (coated with butter, pepper, smoked danish salt and baked at 400 for 15 minutes), my most favorite asparagus (coated in olive oil, sprinkled with salt, pepper, garlic and baked at 350 until done), and some rice pilaf (from a box). Most impressive and yummy! All washed down with some Catawba wine from Torrey Ridge. (Go NY wine!)

Not food but I love my flowers!

Sunday, February 13, 2011

The Pizza that took over the kitchen...

Just give me a frozen Wegman's pizza. ALL I WANT IS A FROZEN WEGMAN'S PIZZA!!!! (You hear that my dear Syracuse readers?! Find a way to mail me one!!)
It would seem that Pizza is going to be my Kitchen Arch Nemesis for a while. If you recall I made a Margherita Pizza last month that came out so-so. It was not overly flavorful, I had problems with the yeast rising, and I didn't have a proper pizza pan so parts of the crust began to burn. Oh and it didn't look pretty at all. Well tonight I used my new pizza pan from the Mother Unit, the pizza tasted delicious, and I had absolutely no problem getting the dough to rise. None at all. In fact, my pizza dough exploded and took over my kitchen. Instead of a deep dish pizza we have a creation Mr. Lawyer dubbed "Cheesey Bread with  Sauce."
Before and After
(BOOM! Pizza take over!)

Chicago Deep Dish Pizza
(Food Network Magazine)
Dough Ingredients:
3 3/4 cups flour
1.5 teaspoons salt
1 1/3 cups warm water
1 tablespoon sugar
3 tablespoons olive oil
Pizza Dough Directions:
Whisk 3 3/4 cups flour and 1 1/2 teaspoons salt. In a bowl mix 1 1/3 cups warm water, 1 tablespoon sugar and 1 packet yeast. When foamy, mix in 3 tablespoons olive oil; add to flour and knead until smooth, 5 minutes. Brush with olive oil, cover in a bowl and let rise until doubled, about 1 hour 30 minutes. Divide into two 1-pound balls. Use 1 pound per recipe unless noted.
Directions for the Chicago Pizza:
1. Press one pound of dough into an oiled and cornmeal dusted 10-inch pizza or cake pan. (the original recipe called for two pounds of dough which I do not recommend)
2. Top with 2 cups each shredded mozzarella and tomato sauce, some cooked sausage and Italian seasoning.
3. Bake at 425 for 40 minutes.
I used some leftover spicy basil tomato sauce, a handful of leftover mozzarella mixed with a bunch of Cabot Cheddar (my life blood), and topped it with some roasted red peppers and artichoke hearts. It tasted amazing! The crust, while perfectly golden and crunchy due to the new ceramic pizza tray, was waaaay too big. It really was like dipping a loaf of bread into a saucy cheesy concoction. As a carb lover I throughly enjoyed this but poor Kevin felt it was a bit much.
That's not too much crust is it?!

Anything with Bacon is amazing!

The Mother Unit came to visit the other weekend and graced us with her bacon wrapped scallops (and chocolate cheese cake!). They were super yummy, super easy, and super quick!

Bacon Wrapped Scallops
(The Mother Unit)

Ingredients:
Scallops
Bacon
Toothpicks
Directions:
1. Cut bacon in half and cook half way in a frying pan.
2. Cut scallops in half and wrap semi-cooked bacon around it. Pin with a toothpick.
3. Broil scallops, flipping half way through till they are done. How long? I have no clue. Mom was not super descriptive as she made them. Perhaps 5 minutes on each side? Care to enlighten us Mom?

The Mother Unit, doing her bacon-scallop thing.

Friday, February 4, 2011

Tasty Thai

So as my Dad always said "It's homemade because I made it in the house!" or something along that lines. This meal was not from scratch but I still loved it. I found some Tasty Thai Noodle Meal Kits by Spaa Natural Foods at Homegoods the other week. They were only a couple bucks but I would consider paying full price if I saw them again. I love Thai food but have always been a little bit scared about making it from scratch so this was a good way to start!
The kit comes with rice noodles and a sauce, you add whatever meat and veggies you want. I purchased Pad Thai Noodles (with delicious sweet sauce and a touch of spice) and Peanut Satay Noodles (with rich and creamy sauce, a savory blend of fresh coconut and roasted peanuts) both were given a "mild" spice rating however the Pad Thai was significantly hotter while the Peanut Satay was not spicy at all. Both were yummy though! I thought the Peanut Satay tasted more like the Pad Thai you would get in a restaurant.
And we had a special kitchen guest! Because of her love of Thai food we had Amanda over for our experiment! She brought over shrimp (yum!), mushrooms and green peppers to stir fry for our dishes. We were also very brave and added egg to our stir fry to make it more traditional. It all came out delicious!

Tasty Thai Pad Thai Noodles and Peanut Satay Noodles
(By Spaa Natural Foods)

Ingredients:
Noodle Kit with Sauce
Your choice of meat and veggies!
2 Eggs
Oil for stir frying
Directions:
1. Bring 4-5 cups of water to a boil. Turn off heat. Soak noodles for 3 minutes. Drain and set aside. (Easy enough but our noodles were very al dente. In the future I would cook them a bit more. Completely my fault as I am not familiar with rice noodles and forgot to sample one!)
2. Stir-fry meat and veggies on high heat with 1 tablespoon of oil. Add egg and mix in.
3. Combine Stir Fry, Noodles and Sauce.
4. Done. Eat. Enjoy.