Thursday, March 31, 2011

Time for dessert!

Amanda had us over for dinner tonight so I made dessert. This is the second time I've made these and they're still good. I might call it more of a hazelnut paste...it's not a cream you can spread with a knife.
Hazelnut Cream Stuffed Snickerdoodle Sandwich Cookies
(Rachael Ray Magazine)
Ingredients:
1 1/4 cups flour
1 teaspoon baking powder
3/4 teaspoon ground cinnamon (divided)
1/2 teaspoon baking soda
1/2 teaspoon salt
1 stick (4 ounces) plus 2 tablespoons unsalted butter, at room temperature
1/2 cup packed light brown sugar
1/4 cup plus 2 tablespoons granulated sugar
1 egg
1 teaspoon pure vanilla extract
3/4 cup blanched and peeled hazelnuts, toasted
1/4 cup confectioners’ sugar, sifted
Directions:
1. Preheat the oven to 375° and line a cookie sheet with parchment. In a small bowl, whisk together the flour, baking powder, 1/4 teaspoon cinnamon, the baking soda and salt.
2. Using a mixer, cream 1 stick butter, the brown sugar and 1/4 cup granulated sugar until fluffy, about 2 minutes. Beat in the egg and vanilla. Mix in the flour mixture at low speed.
3. In a small bowl, mix together the remaining 2 tablespoons granulated sugar and 1/2 teaspoon cinnamon. Using a 1 1/2-inch scoop, form 12 mounds. Dip the rounded side of each mound into the sugar mixture to coat, then place sugar side up and 2 inches apart on the prepared cookie sheet. Bake the cookies until golden at the edges, 12 to 15 minutes. Let cool for about 2 minutes, then, using a spatula, transfer to a rack to cool completely.
4. Meanwhile, using a food processor, finely grind the hazelnuts. Add the confectioners’ sugar and the remaining 2 tablespoons butter; process until smooth. Spread 6 cookies with about 2 teaspoons hazelnut cream each and sandwich with the remaining 6 cookies.

Tuesday, March 29, 2011

Also...

Pottery Barn owns my soul.
Totally worth it.


Bits and Pieces of my childhood

Mr. Lawyer constantly makes fun of me for this garlic bread and yet....he eats it all. There is a story though! Since I grew up in the woods and far, far away from civilization you couldn't just run to the store when you needed something...say like garlic bread. In fact, going to the grocery store was a very exciting field trip and my dad often let me get something special from the cheeeeese island!  So my parents would use whatever was in the kitchen such as left over hot dog rolls. Some rolls, little bit of butter, sprinkle with garlic powder and pop it in the broiler. Done. Hamburger rolls work just as well and yet my brother and I would always fight over the hot dog ones.
He has dubbed this my "from the woods" garlic bread. I wasn't going to let those hot dogs rolls go to waste though! The garlic bread accompanied some pasta with leftover Wegman's Meatballs from the freezer that we topped off with leftover provolone from the thai pizzas.

Monday, March 28, 2011

Lame Lemonade

Well. You've got to have the bad with the good right? Kind of like my burned pancakes. I made some lemonade Sunday evening and it was lame, I didn't even try to make it look pretty. But you always have to try new recipes because you never know. At the moment if you desire lemonade I recommend Food Network's Perfect Lemonade or if you want to mix it up a bit their Cinnamon Grapefruitade. This one let me down, it was more like lemon water. While the simple syrup is an obnoxious part in the Food Network recipe it adds a nice sweetness that this recipe was missing. I was excited about the prospect of just throwing everything in the blender and having lemonade without slaving away over the stove but alas, it was not meant to be. I did like the addition of ice in the blender which not only chilled the lemonade but gave it a slightly slushy texture.
Fresh Lemonade
(Ina Garten....don't worry, I still love you.)
Ingredients:
1 cup freshly squeezed lemon juice (5 to 6 lemons)
1/2 to 3/4 cup superfine sugar, to taste
1 cup crushed ice
4 cups water
Directions:
1. Place all the ingredients in a blender and process until completely smooth. Serve over ice.

Sunday, March 27, 2011

Satay Chicken Pizza

In grad school I developed a slight obsession for Thai food and recently I have been brave enough to start experimenting with it in the kitchen. Granted it's normally in some Americanized version (my spicy peanut shrimp linguine which has yet to be featured here) or a pre-made kit but you have to start somewhere right? I'm also hindered by Mr. Lawyer's dislike of peanut sauces (and bean sprouts!).  I recently had the Thai Chicken Pizza from California Kitchen which was delicious but the copycat recipe had a bazillion ingredients, looked time consuming and required you to make your own pizza dough (my arch-nemesis!). I found another more simple recipe for Satay Chicken Pizza that used pitas instead of making your own crust, ingenious! I also had some satay sauce by Spiral Foods which did not have an overwhelming peanut flavor so the Lawyer could enjoy it.
Satay Chicken Pizza
(adapted from allrecipes.com)
Ingredients:
1 tablespoon vegetable oil
2 skinless, boneless chicken breast halves, chopped into pieces
2 tablespoons soy sauce
1 to 2 tablespoons brown sugar
1 cup prepared Thai peanut sauce (I used a whole lot less)
1 to 3 green onions, chopped (depending on how much you like green onions)
4 small (4 inch) pita breads
Shredded provolone cheese
1 carrot, shredded
Cilantro, chopped peanuts, or jalapenos for garnish
Directions:
1. Heat oil in a skillet over high heat. Saute chicken pieces in hot oil for 6 to 7 minutes. Add the soy sauce and brown sugar in during the last minute and let it simmer down. This adds some flavor and color to the chicken.
2. Preheat oven to 425 degrees F
3. Spoon desired amount of peanut sauce onto each pita. Sprinkle 1/4 of the browned chicken and 1/4 of the scallions on top of each. Top each pizza with cheese. Place on a lightly greased cookie sheet and bake in the preheated oven for 10 to 12 minutes, until the cheese is melted and bubbly. 
4. Let stand for 1 to 2 minutes and sprinkle with carrots, cilantro, jalapeno or peanuts.
So pretty. Such a keeper.
Reasons why this dish is wonderful:
1. No homemade pizza crust diaster!
2. Individual pizzas are easy to customize if you don't like something! I put more sauce and less cilantro on mine.
3. No need to cut it into pieces, pitas are easy to pick up and devour!
4. Provolone Cheese! I was a bit confused by this ingredient...provolone cheese and thai food?! But it worked really well with the flavors and added a nice tang to it. 
The perfect compromise sauce: light on the peanuts and a nice bit of zing
Notes on cilantro: I don't love it but I keep trying it in hopes that one day I will at least be able to enjoy it (much like my hunt for a super drinkable red wine. I'm leaning towards Pinot Noir by the way). It does not taste fresh, citrusy or lemon-limey to me. In fact it tastes kind of soapy, too much ruins a dish so I am always very reserved with it. Evidently this is fairly common and the NY Times ran a whole article on it which can be found HERE.

Good Idea

I'm going to start "Bits and Pieces" entries which are good food ideas that are simple, don't really have a recipe, or involve left overs. The first official Bits and Pieces entry was Vanilla Milkshakes and Nutella Graham Crackers both of which are wonderful ideas. Last night's dinner involved leftover pesto and some extra cheese for good measure.
Pesto meet Pasta!

Saturday, March 26, 2011

Bits and Pieces

I must say that I make a pretty stellar vanilla milkshake. My chocolate ones aren't half bad either. I do tend to fail with strawberry. Mr. Lawyer says my vanilla milkshakes are some of the best ones he has ever had and I'm going to decide that it's not a boyfriend lie. My secret weapon?
Vanilla Bean Paste. It really does make a difference and it's so much better than vanilla extract. Not only is the flavor amazing but it adds little specks of vanilla bean that just up the game. Plus real vanilla beans are expensive unless they magically appear in your mailbox from some mystical tropical island (Hey Sandy!). Back to the milkshake. I have no exact recipe and wing it. It really depends on my mood. Sometimes you want a thick slurpy milkshake that requires a spoon and sometimes you want a smooth one that you can drink through a straw in 10 seconds so the milk to ice cream ratio varies. The good thing is that milkshakes are very forgiving you can add more milk/ice cream to fix it and not only do you reach your desired consistency but you also have more milkshake (and how is that a bad thing?!) I always add a good dollop of Vanilla Bean Paste. It's always awesome.
Vanilla Milkshakes
(the kitchen of Jenni)
Ingredients:
Vanilla Ice Cream
Milk
Vanilla Bean Paste
Directions:
1. Add your desired amount of ice cream and milk to blender and blend.
2. Blend in a good dollop of vanilla bean paste.
3. Enjoy one amazing milkshake.

I whipped up some vanilla milkshakes last night for our impromptu gathering and sous chef Amanda plated Nutella Graham Crackers (because Nutella is always a good idea). Now Nutella Graham Crackers tastes an awful lot like s'mores. Then Amanda made the amazing decision to dunk them into the milkshakes. S'more heaven.
And that's why we didn't have dinner last night.

Goat Cheese, Garlic and Pesto Bruschetta

We've done a pretty good job finishing up leftovers and putting a dent in the super full freezer (seriously, I have a pint of ice cream in the ice machine and therefore no ice and I was also attacked by some rogue chicken cordon bleu that last time I opened the door). To celebrate this accomplish we met Amanda for happy hour at the Kite and the Key (They had Ommegang Chocolate Indulgence! ♥!) and came back to our place for appetizers and dessert (but no dinner).
I have been wanted to make Goat Cheese, Garlic and Pesto Bruschetta which we originally had when we went out to Tria with the boys. It was amazing and Weggy was in need of some pruning so it was the perfect time to make some fresh pesto.
Say hi to Weggy enjoying his prime Center City view:
(before and after pruning)
Mr. Lawyer constantly makes fun of me for naming my plants, talking to them, and generally becoming too attached to them but I argue that I get a better product and happy plants. Without Weggy this meal would not have been possible and it was delicious so he deserves a little respect!
Goat Cheese, Garlic and Pesto Bruschetta
(inspired by Tria, Pesto recipe from Giada)
Pesto Ingredients:
2 cups packed fresh basil leaves
1/4 cup toasted pine nuts (many recipes also use walnuts which are cheaper)
1 garlic clove, peeled
1/2 teaspoon kosher salt, plus more for seasoning
1/4 teaspoon freshly ground black pepper, plus more for seasoning
1/2 to 2/3 cup extra-virgin olive oil
1/2 cup grated Parmesan
Pesto Directions:
1. In a blender or food processor, pulse the basil, pine nuts, garlic, 1/2 teaspoon of salt, and 1/4 teaspoon pepper until finely chopped.
2. With the machine running, slowly add the olive oil until the mixture forms a smooth and thick consistency.
3. Add the Parmesan and pulse until combined. Season with salt and pepper, to taste.
Bruschetta Ingredients:
Yummy Baguette
Pesto
Goat Cheese
Garlic
Bruschetta Directions:
1. Slice the baguette and toast it at 425 degrees for 8 minutes (4 minutes each side)
2. Remove toast from oven and rub with garlic
3. Spread on goat cheese and top with pesto
It's a great combination but you have to like goat cheese which is very strong and rich. The pesto was better after it sat for a couple of hours. Definitely a keeper.

Tuesday, March 22, 2011

Biscuits and such

It's not a cooking week. We're working on leftovers and freezer stuff. Today Woody's leftover meaty manly chili, tomorrow hot dogs! But the poor chili just needed a little something so I whipped up some biscuits. The biscuits came out wonderfully, like something Grandpa Norm would make! In continuing with my compound butter addiction I made some Marmalade Butter. It was good but I'm not sure I would make it again unlike my garlic butter or cinnamon honey butter. It's definitely more of a brunch thing and the Lawyer isn't really a fan of orange marmalade ("It's like eating pulp!") so I will be eating it all up myself.
Biscuits
(from seriouseats.com)
Ingredients:
2 1/4 cups all-purpose flour
2 1/4 teaspoons cornstarch
1 tablespoon sugar
1 tablespoon baking powder
1 3/4 teaspoon salt
1/4 teaspoon baking soda
1 stick or 1/2 cup cold unsalted butter
2 tablespoons cold cream cheese
1/2 to 3/4 cup cold buttermilk
Directions:
1. Preheat oven to 425°F. Line a baking sheet with parchment paper.
2. In the bowl of a food processor, combine all of the dry ingredients and mix well.
3. Add butter and pulse until butter is finely dispersed throughout dry ingredients.
4. Add cream cheese and pulse to distribute, leaving a few small, pea-sized pieces of cheese in tact. Turn mixture into a mixing bowl.
5. Drizzle in about a 1/3 cup of the buttermilk and toss gently with your hands to evenly distribute. Add more milk a tablespoon or so at a time until dough is just moist enough to come together without any dry crumbly bits.
6. Turn the dough out onto a lightly floured surface. Dust the surface of the dough lightly with more flour and pat the dough out to about ¾-inch thick.
7. Fold the dough back over on itself in thirds and pat out to about 3/4-inch thick again, flouring the surface lightly as needed to prevent the dough from sticking.
8. Fold the dough back over on itself in thirds again, then pat it out to a final thickness of about 1/2 inch.
9. Using a lightly floured 2 1/4-inch round cutter, cut the dough into rounds and place on prepared baking sheet, at least an inch apart. Scraps may be gently packed together, patted out to 1/2-inch thickness once more and cut.
10. Bake for 12 to 15 minutes, until biscuits are well-risen, pale golden on top and a deeper brown on their bottoms.

Marmalade Butter
(Ina Garten)
Ingredients:
1 stick butter, room temperature
1/2 cup good orange marmalade
1/8 teaspoon kosher salt
Directions:
1. Mix it all together and serve at room temperature

Saturday, March 19, 2011

Our Italian Market Adventure!

This entry is about amazing food and yummy things but I didn't actually make anything and there's going to be a ton of pictures so I will actually use a page break, even though I despise them.
Today it was nice and warm (sundress time!) so Kevin and I ventured out to South Philly to explore the Italian Market. Best Saturday morning ever. I'm always a little camera happy so the following is a picture story of our adventure or as Kevin called it "It's a good day when you have cheese steak grease on your pants."

SU and Birthdays and a Dinner Party oh my!

Happy Dinner Party/Birthday Amanda/Go SU! We certainly had lots to celebrate Friday night. For my birthday I couldn't decide which cupcakes to make: Irish or S'mores? Obviously I went with the Irish ones and had to wait for an opportunity to make the S'more ones...enter Amanda's birthday! They were a bit messy to eat but they certainly tasted like a S'more.
Ingredient/Technical Difficulties: Marshmallow Fluff is harder to find around here then I thought. The local stores had all sorts of peanut butter, jam and jellies but no fluff! Just as I was mentally preparing to make it from scratch Mr. Lawyer found some Ricemallow Fluff from Whole Foods. It tasted fine, a bit sweeter maybe but it did not hold it's shape which posed a problem with making the garnish. It oozed all over the place and didn't harden up. I charred up some mini marshmallows which worked wonderfully and looked more visually pleasing (you can see both toppings in the photo). I would recommend using fluff for the filling but going the normal marshmallow route for the topping. Either way prepare for a mess, I was very angry at marshmallows while making these (who on earth would ever make something so sticky and messy!! Grrr...). However I thought that the toasted marshmallow on top added some of the best flavor, nothing like nice toasty caramelized sugar to zing up a cupcake. Also, Cupcake Corer.  Best five dollars I ever spent.

S'more Cupcakes
(Bon Appétit Magazine)
Ingredients:
1 1/2 cups graham cracker crumbs (about 1 packet)
1/2 cup all purpose flour
2 1/2 teaspoons baking powder
1/2 cup (1 stick) unsalted butter, room temperature
3/4 cups sugar
2 large eggs
1 teaspoon vanilla extract
3/4 cup whole milk
8 ounces bittersweet chocolate chopped
1/2 cup heavy whipping cream
3/4 cup plus one 7-ounce jar marshmallow creme (Or 7oz of marshmallows)
Nonstick vegetable oil spray
12 1-inch pieces broken graham crackers (for garnish)
Directions:
1. Preheat oven to 350°F. Line 12 standard muffin cups with paper liners. Whisk graham crumbs, flour, baking powder, and pinch of salt in medium bowl. Beat butter and sugar in large bowl until light and fluffy. Add eggs 1 at a time, beating to blend between additions. Beat in vanilla. Add graham-cracker mixture in 3 additions alternately with milk in 2 additions, beginning and ending with graham-cracker mixture. Divide batter among muffin cups.
2. Bake cupcakes until tester inserted into center come out clean, about 22 minutes. Transfer cupcakes to rack; cool completely.
3. Place chocolate in medium bowl. Bring cream just to boil in small saucepan; pour over chocolate. Let stand 1 minute; stir until smooth. Cool ganache until lukewarm.
4. Core cupcakes with a  cupcake corer, apple corer, spoon, etc. Spoon 3/4 cup marshmallow creme into resealable plastic bag, pushing into 1 bottom corner. Cut 1/2 inch off corner. Pipe into holes in cupcakes. Spread 2 teaspoons ganache over each cupcake.
5. Preheat broiler. Coat rimmed baking sheet with nonstick spray. Spoon dollops of marshmallow creme on sheet (or marshmallows!). Broil until slightly charred, 1 to 2 minutes. Spoon dollop of charred creme over each cupcake; garnish with piece of graham cracker.
Poorly behaving Ricemallow Fluff and well behaved but messy mini marshmallows.
Final Product? Amazing.

There's a bunch more so I will use a super obnoxious page break. Read on for the rest of our goodies!

Wednesday, March 16, 2011

Happy St. Patrick's Day!

I seem to have an obsession with alcoholic cupcakes. These Irish Coffee Cupcakes are more mellow than the Irish Car Bomb Cupcakes in both alcohol content and sweetness but still pretty amazing (although not as much fun?!?....). Both cupcakes are best the day they were made and okay the next day as the alcohol begins to evaporate from cake and frosting so it loses a lot of the flavor. I can't pick a favorite between the two recipes because they are both amazing! But this is obviously the sophisticated adult cupcake while the Irish Car Bomb Cupcake is the drunken college kid cupcake.
Irish Coffee Cupcakes
(Martha Stewart Magazine)
Ingredients:
2 cups all-purpose flour
1 teaspoon baking powder
1/4 teaspoon baking soda
1/4 teaspoon salt
1/2 cup boiling water
2 tablespoons instant-espresso powder
1/4 cup whole milk
1 stick unsalted butter, room temperature
1/2 cup granulated sugar
1/2 cup packed light-brown sugar
2 large eggs
Frosting Ingredients:
1 cup heavy cream
1 tablespoon confectioners' sugar
1 tablespoon whiskey
Instant-espresso powder, for dusting
Directions:
1. Preheat oven to 350 degrees. Whisk together flour, baking powder, baking soda, and salt. 
2. Pour hot water over espresso powder; let cool. Combine espresso with milk. 
3. Beat butter and granulated and brown sugars with a mixer on medium speed until pale and fluffy, about 3 minutes. Add eggs, 1 at a time, beating well after each addition. Beat in flour mixture in 3 additions, alternating with espresso-milk mixture.
4. Fill about 15 cupcake cups and bake 20 to 22 minutes. Let cool.
5. Make the frosting: Whisk together cream and confectioners' sugar until medium peaks form. Add whiskey; whisk until slightly stiff peaks form.
6. Top each cupcake with 2 tablespoons frosting; dust with espresso powder.
mmmm...Happy St. Paddy's Day!

Perfect Lemonade

I made some homemade lemonade the other day for my dinner party. I think this is the third time I've made this particular recipe. It's very good if you like sweet things. If you don't like sweet things you'll have to dilute it a bit or let Woody make it into marvelous vodka lemonade martinis.
Perfect Lemonade
(Food Network Magazine)
Ingredients:
1.5 cups sugar (for Simple Syrup)
1.5 cups water (for Simple Syrup)
Zest of 2 lemons
2 cups lemon juice
2 more cups water
1/2 teaspoon salt
Directions:
1. Remove wide strips of zest from 2 lemons with a vegetable peeler (do not remove the pith). Make 2 cups simple syrup (recipe below), adding the lemon zest before heating. Let cool, then pour into an ice-filled pitcher. Stir in 1/2 teaspoon salt, 2 cups each fresh lemon juice and water, and some lemon slices.
2. Simple Syrup: To make 2 cups simple syrup, bring 1 1/2cups each sugar and water to a boil, stirring until dissolved. Let cool.
Classing it up.

Monday, March 14, 2011

Dinner Party!

What's a girl to do when she's missing Upstate NY and all it's snowy glory? Throw a dinner party of course! Because then you're just spazzing out about food. Luckily Woody and Amanda decided to indulge me with less than 24 hours notice because that's how they roll.
The Menu:
Drinks: Homemade Lemonade, artfully crafted into Vodka Lemonade Martinis by the masterful Woody
Apps: Chicken Wings from Amanda
Dinner (by Giada!): Caramelized Pancetta and Fennel Salad and Creamy Baked Fettuccine with Asiago and Thyme
Dessert: Zucchini Nut Bread Cookies
And it was all pretty yummy. I would definitely make the salad again even though I couldn't find pancetta and subbed in some prosciutto. I'm slightly enameled with fennel (but only cooked/baked and absolutely no fennel seeds!) The pasta was decent but obviously not your normal heavy mac and cheese. It was light and slightly tangy from the asiago and creme fraiche, the thyme added a nice subtle flavor. If I made it again I would definitely beef it up with some chicken or veggies to give it a little extra something.
Caramelized Pancetta and Fennel Salad
(By Giada, Everyday Italian)
Ingredients:
1 bulb fennel, halved and cut into 1/2-inch wedges
5 slices pancetta (prosciutto or bacon can be substituted)
2 cloves garlic, minced
2 tablespoons brown sugar
1 tablespoon extra-virgin olive oil
1/4 teaspoon salt
1/8 teaspoon freshly ground black pepper
5 ounces (about 6 to 7 cups) mixed salad greens
Red Wine Vinaigrette, recipe follows
Directions:
1. Preheat the oven to 400 degrees F. Line a baking sheet with parchment paper.
2. In a medium bowl, toss together fennel, pancetta, garlic, brown sugar, olive oil, salt, and pepper. Place the ingredients on the baking sheet in a single layer. Cook until the pancetta is crisp and the fennel is caramelized, about 20 minutes. Remove from the oven and let cool for 5 minutes.
3. In a large bowl, place the salad greens, crumbled pancetta, and caramelized fennel. Toss the salad with the Red Wine Vinaigrette and serve immediately.
Red Wine Vinaigrette
Ingredients:2 tablespoon red wine vinegar
1 tablespoon lemon juice
1/2 teaspoon honey
1/2 teaspoon salt
1/8 teaspoon freshly ground black pepper
1/4 cup extra-virgin olive oil
Directions:
1. Mix the vinegar, lemon juice, honey, salt, and pepper in a blender. With the machine running gradually blend in the oil. Season the vinaigrette, to taste, with more salt and pepper, if desired
Creamy Baked Fettuccine with Asiago and Thyme
(By Giada, Everyday Italian)
Ingredients:
1 pound fettuccine pasta (I used rotini because that's what I had on hand)
2 cups grated Asiago cheese, plus 1/4 cup
2 (8-ounce) containers creme fraiche
1 cup grated Parmesan
1 1/2 tablespoons fresh chopped thyme leaves
1/2 teaspoon salt
1/2 teaspoon freshly ground black pepper
Directions:
1. Preheat the oven to 375 degrees F.
2. Bring a large pot of salted water to a boil over high heat. Add the pasta and cook until tender but still firm to the bite, stirring occasionally, about 8 to 10 minutes. Drain pasta reserving 1 cup of the pasta cooking liquid.
3. In a large bowl combine the 2 cups Aiago cheese, creme fraiche,Parmesan, thyme, salt, pepper, cooked pasta, and pasta cooking liquid. Gently toss until all the ingredients are combined and the pasta is coated. Place the pasta in a buttered baking dish and sprinkle with the remaining 1/4 cup asiago cheese. Bake until golden on top, about 25 minutes. Let sit for at least 5 minutes and serve.

And now I'm not going to cook for the rest of the week. Hooray leftovers!

Sunday, March 13, 2011

Zucchini Cookies? Yes!

When the Lawyer is away the Jenni will bake.
In addition to the yummy cheese straws, I decided to make some oh so delicious zucchini cookies from my Martha Stewart Magazine. Keeeeeper! Oh Martha how I love you. Even though most of your crafts I attempt turn out horribly...like last years Easter Egg stenciling dying shenanigans. Your recipes on the other hand, gold. Solid gold. Like this one.
Zucchini Nut Bread Cookie Sandwiches
(Martha Stewart Magazine)
Ingredients:
1 cup all-purpose flour
1 1/4 teaspoons ground cinnamon
1/2 teaspoon baking soda
1/2 teaspoon baking powder
1/4 teaspoon coarse salt
1 1/2 sticks unsalted butter, room temperature and divided
1/2 cup granulated sugar
1/2 cup packed light-brown sugar
1 large egg
1/2 teaspoon pure vanilla extract
1 cup finely grated zucchini
1 cup old-fashioned rolled oats
1/2 cup chopped toasted walnuts
8 ounces cream cheese, room temperature
1 cup confectioners' sugar, sifted
Directions:
1. Sift flour, cinnamon, baking soda, baking powder, and 1/4 teaspoon salt into a bowl. Beat 1 stick butter and the sugars until pale and fluffy. Beat in egg and vanilla.
2. Beat flour mixture into butter mixture. Mix in zucchini, oats, and walnuts. Refrigerate until firm, about 1 hour.
3. Preheat oven to 350. Using a 1 1/2-inch ice cream scoop (about 2 tablespoons), drop dough onto parchment-lined baking sheets, spacing about 2 inches apart. Bake until edges are golden, about 17 minutes. Let cool on a wire rack.
4. Beat together remaining 1/2 stick butter, the cream cheese, and confectioners' sugar until smooth. Spread 1 heaping tablespoon filling onto the flat side of 1 cookie, and sandwich with another cookie. Repeat with remaining filling and cookies.
Love it.

Saturday, March 12, 2011

Holy Cheesy Goodness!

I need to have a gathering ASAP so I can share these amazing Cheese Straws. This was my morning project, they were incredibly easy and there might not be any left by the time Kevin gets home tomorrow. I mean what's not good about cheese? Especially when that cheese is Cabot Cheddar? And we all know I have a major, major weakness for Cabot.
It called for half-and-half but I just used milk and they were fine. Add more or less red pepper flakes depending on how spicy you want them. They were amazing out of the oven and still amazing when they were cold.
Cheese Straws
(found this one on smittenkitchen. com, a wonderful site!)
Ingredients:
1 1/2 cups grated extra-sharp Cheddar cheese

4 tablespoons unsalted butter, softened and cut into 4 pieces

3/4 cup flour, plus more for dusting

1/2 teaspoon kosher salt
1/2 teaspoon crushed red pepper flakes

1 tablespoon half-and-half (I used milk)
Directions:
1. Preheat oven to 350°F.
2. In a food processor, combine the cheese, butter, flour, salt and red pepper in five 5-second pulses until the mixture resembles coarse crumbs. Add the half-and-half and process until the dough forms a ball, about 10 seconds.
3. On a lightly floured surface, using a lightly floured rolling pin, roll the dough into an 8- by 10-inch rectangle that is 1/8-inch thick. With a sharp knife, cut the dough into thin 8-inch strips, each 1/4- to 1/3-inch wide. Gently transfer the strips to an ungreased cookie sheet leaving at least 1/4-inch between them.
4. Bake the straws on the middle rack for 12 to 15 minutes, or until the ends are barely browned. Remove from the oven and set the cookie sheet on a rack to cool.
5. Serve at room temperature. Cheese straws will keep in the refrigerator, in a sealed container, for two days.
Shameless Ommegang Advertising

Girl's Night In!

With Mr. Lawyer out of town Amanda and I decided to have a totally out of control girl's night complete with fancy martinis, ice cream sundaes/milkshakes, a wonderful tv show and....college basketball (which Amanda watched just for me so thanks! Also, boooooo SU! So sad.). We are also working our way through all of Trader Joe's frozen appetizers which we seem to have at all of our gatherings. This time we had Chicken Shu Mai (dumplings) and a four cheese flatbread (we have also had the mushroom and truffle flatbread, crab cakes, and the spanakopita). We had an insane amount of toppings for the ice cream but best of all were the espresso martinis! Even though I didn't have any coffee beans to use as garnish which totally ruined the night! Ha. So they weren't that pretty but SU was stressing me out.
Espresso Martinis
(Serves 2)
Ingredients:
7 oz vodka (Stoli coffee-flavoured vodka is a good choice)
1/2 oz Kahlua
1/2 oz espresso
4 coffee beans, for garnish
Directions:
1. In a cocktail shaker, shake vodka with crushed ice for about 30 seconds.
2. Add Kahlua and espresso and give another couple of shakes to combine. Let stand for a minute, to fully chill through.
3. Strain into 2 chilled martini glasses, and add 2 coffee beans to each glass.
The following pictures were taken by Amanda!
Garnishing the martini glasses
Our Trader Joe's Dumplings
Holy Toppings! (I took this one)
And my evil milkshake with glowing red demon eyes. It was delicious.

Friday, March 11, 2011

Self Explanatory

Bagels and Lox
(from everyone)
Ingredients:
Bagels
Cream Cheese
Lox
Other things....like onions or capers
Directions:
1. Put it all together and eat it.

Thursday, March 10, 2011

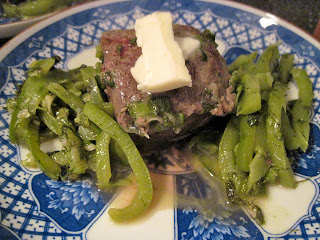
Baby Dill Steak

I lied. I felt guilty about not cooking and we had all this dill left over from the dill biscuits and a bunch of steaks in the freezer so I dug up this fabulous recipe from the internet. We were incredibly surprised with how well it turned out, just the right amount of dill flavor and perfectly cooked. I did the research and prep work (look at those knife cuts! Thank you Food Network!) and the lawyer did the cooking and dishes (Score!).
Baby Dill Steak
Ingredients:
Olive Oil
1/2 cup fresh baby dill
1 cup fresh scallions, chopped
1/2 cup green peppers, chopped
Sea salt and cracked pepper
Butter
Directions:
1. Heat pan with a light coating of olive oil on low heat, add dill, scallions and peppers. Cook for a few minutes.
2. Season steak with salt and pepper before adding it to the pan (with the veggies!), cover and cook for a few minutes depending on the size and then flip the steak and cook a few more. We did 7 minutes on the first side and 5 on the second side.
3. After you plate your steak and veggies, add a pat of butter to your steak.
Doing his thing.

Also, Go 'Cuuuuuuuse!!!!

Mozzarella Toasts!

I've been horribly uninspired and lazy in the kitchen this week. But last month I made mozzarella toasts with left over bread and cheese! I used some of my fresh Wegman's basil (The Lawyer suggested naming the plant Baaasil but I think I'm just going to start calling it Weggy for Wegmans) and I made a balsamic reduction to top it all off. I brought this to lunch for at least half of summer camp, yay variety. Plus I had so much basil I didn't know what to do with it.
Mozzarella Toasts
(Just winging it)
Ingredients:
Toasted Bread
Mozzarella
Fresh Basil
Balsamic Vinegar
Optional: Sugar for a sweeter reduction
Directions:
1. Toast your bread, slice your cheese and chop up your basil. (Or toast your bread and cheese together for gooey cheese)
2. Heat up your balsamic on medium heat and reduce till syrupy and it coats a spoon (but don't burn your tongue taste testing like I did). If you want a sweeter reduction add in sugar to taste.
3. Be artsy and drizzle your reduction over your toasts.

Monday, March 7, 2011

Biscuits of the Dill Variety

These biscuits are easy and yummy. This is the second time that I've made them (and they came out better the first time!) This time the dill flavor wasn't too pronounced. And I'm still overly thrilled that I have a new food processor and it tends to mesmerize me and I overworked the dough a little bit so the biscuits weren't too crumbly and biscuit like but more silky.
This honey butter recipe accompanied the dill biscuits. I prefer the cinnamon honey butter but cinnamon and dill isn't the best combination. After having that one this regular honey butter seems a bit plain. On the upside using coarsely ground sea salt means that every once in a while you get a nice salty crunch mixed in  with all the sweet stuff which is amazing.
Dill Biscuits with Honey Butter
(Food Network Magazine)
Ingredients:
2 cups all-purpose flour, plus more for dusting
2 teaspoons baking powder
1/4 teaspoon baking soda
1 teaspoon fine salt
12 tablespoons cold unsalted butter, diced
2 tablespoons chopped fresh dill
1/2 cup buttermilk, plus more for brushing
Directions:
1. Preheat the oven to 425 degrees F. Pulse the flour, baking powder, baking soda and fine salt in a food processor. Add the butter and pulse into pea-size pieces. Add the dill, then slowly pulse in the buttermilk until the dough just comes together. Transfer to a floured surface and knead three to five times. Shape into a disk.
2. Roll out the dough to about 1/2 inch thick. Cut into rounds with a 2 1/2-inch round cutter or a glass. Reroll any scraps. Place on a baking sheet, brush with buttermilk and bake until golden, 10 to 12 minutes.
Honey Butter
Ingredients:
4 tablespoons unsalted butter, softened
2 teaspoons honey
1/4 teaspoon sea salt
Directions:
1. Mix the butter, honey and sea salt in a bowl until smooth. Serve with the warm biscuits.